[Programming] Test Driven Developement (TDD) using C++ and Google Test
“A program that has not been tested does not work.” — Bjarne Stroustrup
Being a person working in Image processing area since last 10 years, both as a student or researcher, I worked mostly using MATLAB. Since Ph.D, I am more interested into working in this area by using productive and legendary languages namely Python and C++, respectively. Obvious reason for choosing these languages is that, C++ has been tested through the time and still going strong with C++20 standard likely to come soon. About Python, it’s being adapted universally due to it’s simplicity, flexibility and maintainability features.
In this context, I came across an excellent course “Modern C++ for Computer Vision & Image Processing” offered by University of Bonn in years 2018 and 2020. Instructors of both the courses are researchers having wide experience in C++ with industry. While doing the assignments of these courses, a new skill that I came across was the unit testing framework used by them to check the codes. I found that amusing since it felt like an invisible guide providing me an immediate feedback in my self-learning journey. My confidence was boosted by the fact that If I passed these test cases, I will be on the right learning track. I searched a bit about such testing frameworks and came to know that such kind of programming practice is considered as the “best practice” and is called as the Test Driven Developement (TDD).
What is TDD?
Verbatim from [1]
Test-Driven Development (TDD), is a software design technique devised in the late 1990s and it can help you wrestle your C++ system to the ground and keep it under control as you continue adding new features.
What are different libraries that enable TDD based C++ developement?
-
and many more! Checkout this wikipage for more details.
In this post, I will discuss googletest, one of the widely used C++ testing framework.
Before, moving forward a brief about my developement environment.
-
OS: Ubuntu 20.04
-
C++ Compiler: Clang 10.0.1
-
Text Editor: VS Code
-
Build System Generator: CMake 3.19.0
How to install latest CMake on Ubuntu
I prefer to have latest version of cmake installed on my computer. You can do the same using following steps.
-
Go to https://cmake.org/download/ and choose binary distribution with .sh prefix under Linux x86_64 section.
-
Download the same in home folder.
-
Open the terminal and run following command
sudo sh cmake-3.19.0-rc1-Linux-x86_64.sh --prefix=/usr/local/ --exclude-subdir
We have to install the cmake in /usr/local/ since CMake package is not managed by global system package manager.
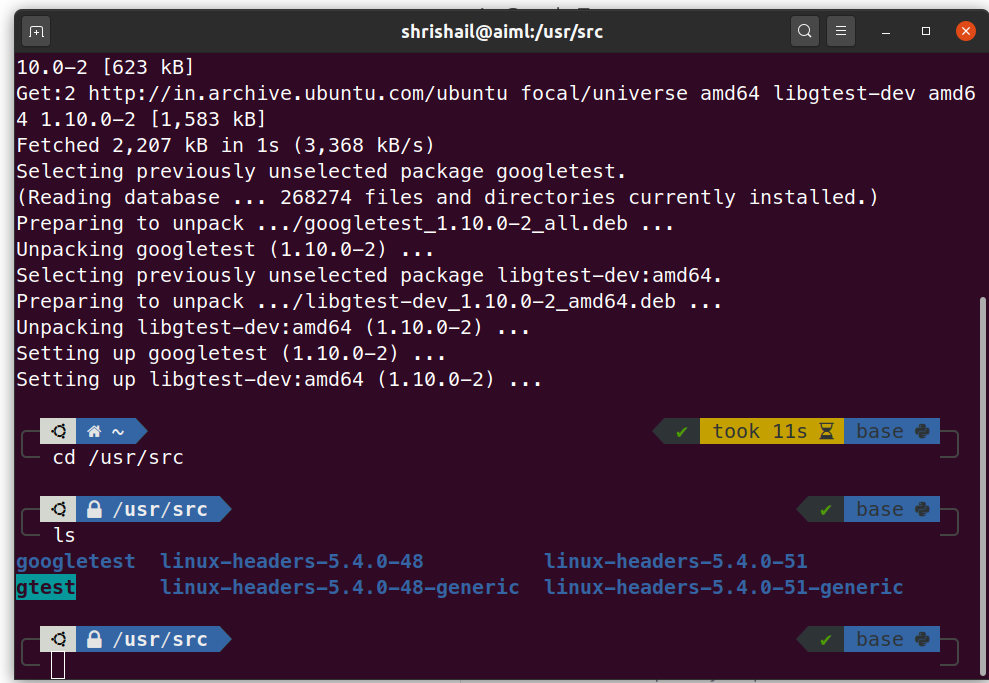
How to install googletest on Ubuntu.
# Step-1: Install the latest/stable version of gtest using
sudo apt-get install libgtest-dev
# Note above step only copies the source code in /usr/src
# One can see below "gtest" folder created in usr/src
# Step-2 : We need to compile the source code of gtest to create
# two static libraries "gtest.a" and "gtest_main.a" for using them.
cd /usr/src/gtest
sudo cmake CMakeLists.txt
sudo make
# Lets copy the static libraries to /usr/lib
cd lib
sudo cp *.a /usr/lib
Note: The above steps will install the google test libraries which will be available system wide (globally). But it is also recommended to include the googletest folder locally to the C++ project as a library if you want to work on different projects depending on different versions of gtest.
What are the different steps used in TDD?
-
Write the failing unit test
-
Make the failing test pass (Green phase)
-
Refactor the code if possible
Let us understand above 3 steps using an example.
Problem Statement:
Write a program that prints all the numbers from 1 to 100. For multiples of 3, instead of the number, print “Fizz”, for multiples of 5 print “Buzz”. For numbers which are multiples of both 3 and 5, print “FizzBuzz”.
Let us solve the above problem using TDD approach by developing a library function fizzBuzz which will be used to achieve the final result.
Solution:
The project directory structure is as follows before starting the developement.

The project directory name is tdd_fizzbuzz which contains root CMakeLists.txt. The include folder contains the header file for our fizzBuzz function. The src folder contains fizzbuzz.cpp having our function to be tested and being developed. There is a tests folder which contains its own CMakeLists.txt and test_tdd_fizzbuzz.cpp where we will put the unit tests which will provide us feedback to implement the fizzBuzz function.
Here is the sample to do list for writing the test cases while developing the function (Taken from [2], an excellent course to learn TDD based C++ developement).
-
Can I call the fizzBuzz function?
-
Get “1” when I pass 1
-
Get “2” when I pass 2
-
Get “Fizz” when I pass 3
-
Get “Buzz” when I pass 5
-
Get “Fizz” when I pass 6 (multiple of 3)
-
Get “Buzz” when I pass 10 (multiple of 5)
-
Get “FizzBuzz” when I pass 15 (a mupltiple of 3 and 5)
Before diving into the explanation, take a look at the CMakeLists.txt files in the root i.e., tdd_fizzbuzz and tests directories. Also, take a look at fizzbuzz.h and fizzbuzz.cpp files.
CMakeLists.txt in root directory:
cmake_minimum_required(VERSION 3.15)
project(tdd_fizzbuzz)
# Generate the library libfizzbuzz
add_library(libfizzbuzz src/fizzbuzz.cpp)
include_directories(${CMAKE_CURRENT_SOURCE_DIR}/src/)
include_directories(${CMAKE_CURRENT_SOURCE_DIR}/include/)
# For Google Test
enable_testing()
add_subdirectory(tests)
CMakeLists.txt in tests directory:
include(CTest)
set(TEST_BINARY ${PROJECT_NAME}_test)
add_executable(${TEST_BINARY} test_tdd_fizzbuzz.cpp)
target_link_libraries(${TEST_BINARY} libfizzbuzz gtest gtest_main pthread)
add_test(test_1 tests/test_tdd_fizzbuzz.cpp)
fizzbuzz.h
#pragma once
#include <string>
std::string fizzBuzz(int n);
fizzbuzz.cpp
#include "fizzbuzz.h"
// function fizzBuzz to be implemented
Now, let us write a failing test case.
#include <gtest/gtest.h>
#include <string>
#include "fizzbuzz.h"

TEST(TestTddFizzBuzz, CanCallFizzBuzz) {
  GTEST_ASSERT_EQ("1", fizzBuzz(1));
}
Now the above test case is going to fail because the function fizzBuzz is not yet implemented.
So, we have successfully written a failing test case for “Can I call the fizzBuzz function?” which completes our first step.
In the second step, let us make it pass. For that we will write the fizzBuzz function as follows:
#include "fizzbuzz.h"
#include <string>

std::string fizzBuzz(int n) {
  return std::to_string(n);
}
Now, if we compile again the test binary with name tdd_fizzbuzz_test will produce following output. The above binary is in /build/tests/ folder
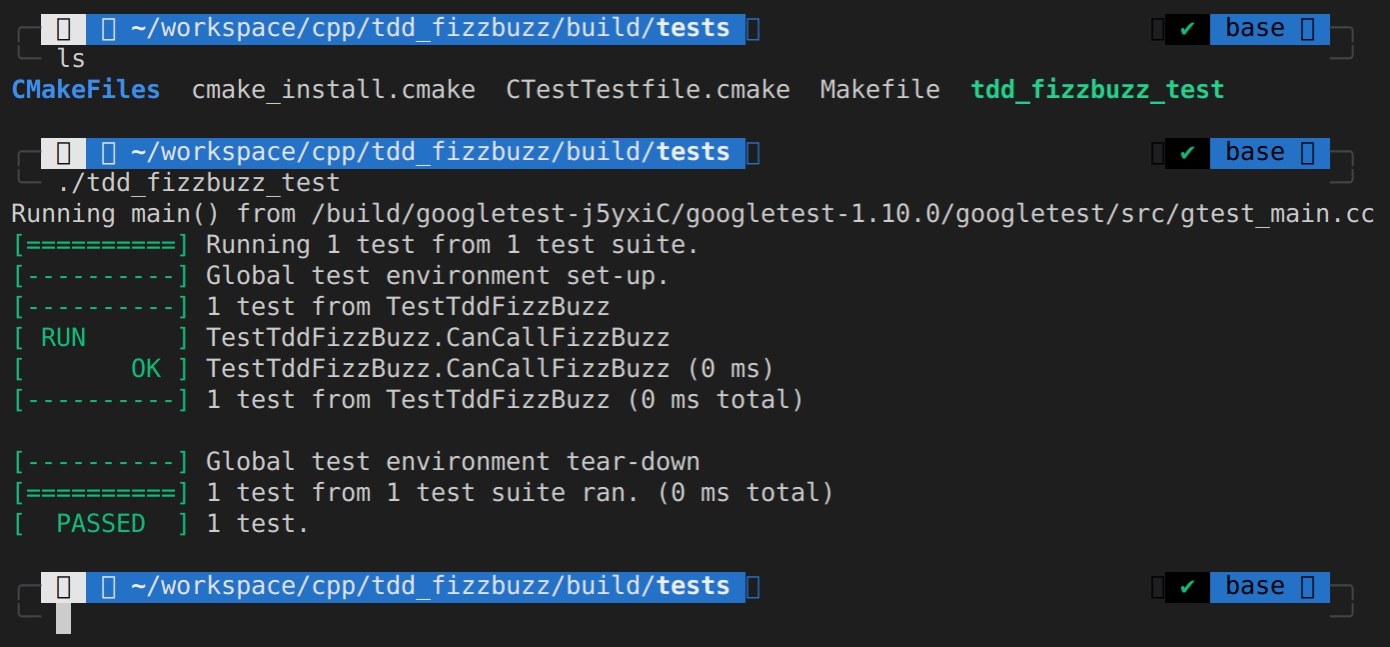
Steps used to compile and run the program:
mkdir build && cd build && cmake ..
make
After, we complete our second step, the next step is to refactor the code.
What is Code Refactoring? Why it is useful?
Verbatim from [3]
Refactoring is intended to improve the design, structure, and/or implementation of the software (its non-functional attributes), while preserving its functionality. Potential advantages of refactoring may include improved code readability and reduced complexity; these can improve the source code’s maintainability and create a simpler, cleaner, or more expressive internal architecture or object model to improve extensibility.
With the code as in fizzBuzz function following test cases for following assertions will get passed.
-
Can I call the fizzbuzz function?
-
Get “1” when I pass 1
-
Get “2” when I pass 2
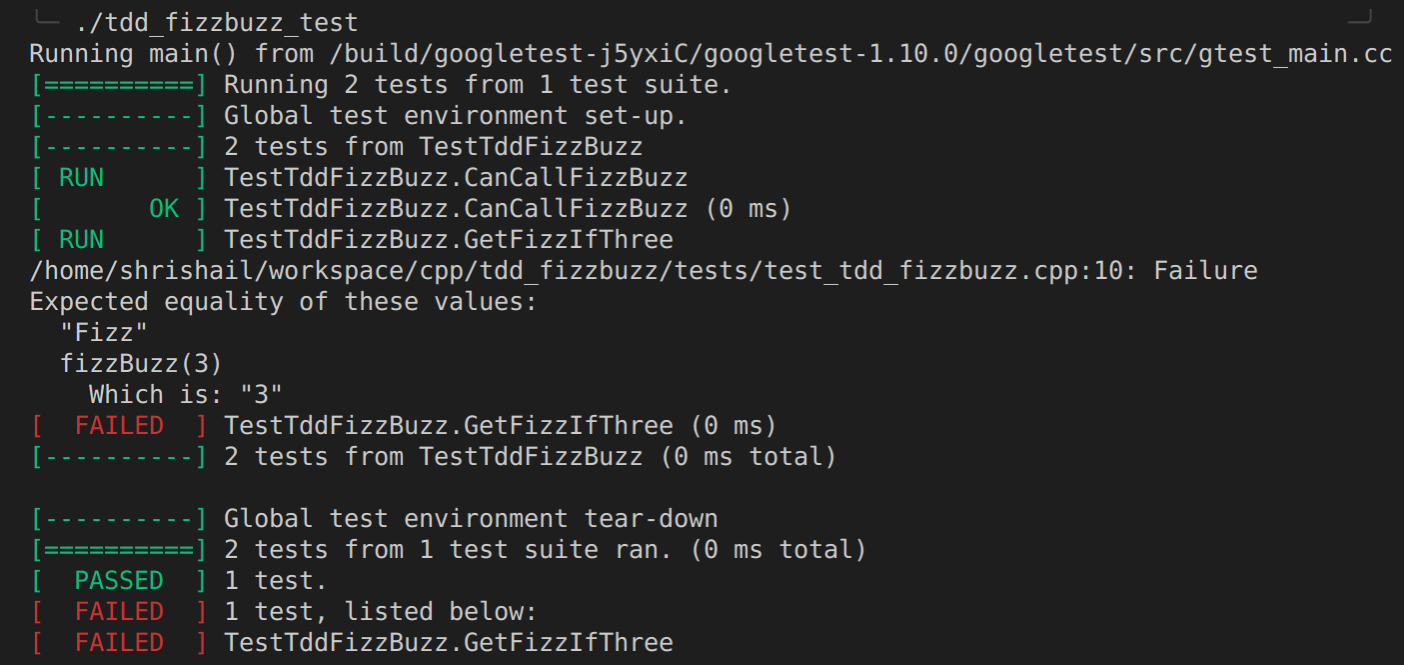
Next, we should get “Fizz” when we pass 3
Step:1 Write a failing test case as:
TEST(TestTddFizzBuzz, GetFizzIfThree) {
  GTEST_ASSERT_EQ("Fizz", fizzBuzz(3));
}
The test binary output looks like:
Let’s pass it, by adding following code in our fizzBuzz function
#include "fizzbuzz.h"
#include <string>

std::string fizzBuzz(int n) {
  if (n == 3) {
    return "Fizz";
  }
  return std::to_string(n);
}
You may take decision about refactoring accordingly.
Similarly, we can also complete the case “Get “Buzz” when I pass 5”.
-
Get “Fizz” when I pass 3
-
Get “Buzz” when I pass 5
For the current status of our fizzBuzz function the test cases for
-
Get “Fizz” when I pass 6 (multiple of 3)
-
Get “Buzz” when I pass 10 (multiple of 5)
are going to fail, which we can pass by modifying the function as:
#include "fizzbuzz.h"
#include <string>

std::string fizzBuzz(int n) {
  if ((n%3)==0) {
    return "Fizz";
  } else if ((n % 5) == 0) {
    return "Buzz";
  }
  return std::to_string(n);
}
The test binary output now is:
For the current version of our fizzBuzz function the test case for “Get “FizzBuzz” when I pass 15 (a mupltiple of 3 and 5)” is going to fail.
The test case in this case can be written as:
TEST(TestTddFizzBuzz, GetFizzBuzzIfMultipleOfThreeAndFive) {
  GTEST_ASSERT_EQ("FizzBuzz", fizzBuzz(15));
}
The test binary will be now

Now with final modification to our fizzBuzz function as
#include "fizzbuzz.h"
#include <string>

std::string fizzBuzz(int n) {
  if (n%3==0 && n%5==0) {
    return "FizzBuzz";
  } else if (n % 3 == 0) {
    return "Fizz";
  } else if (n%5==0) {
      return "Buzz";
  } else {
    return std::to_string(n);
  }
}
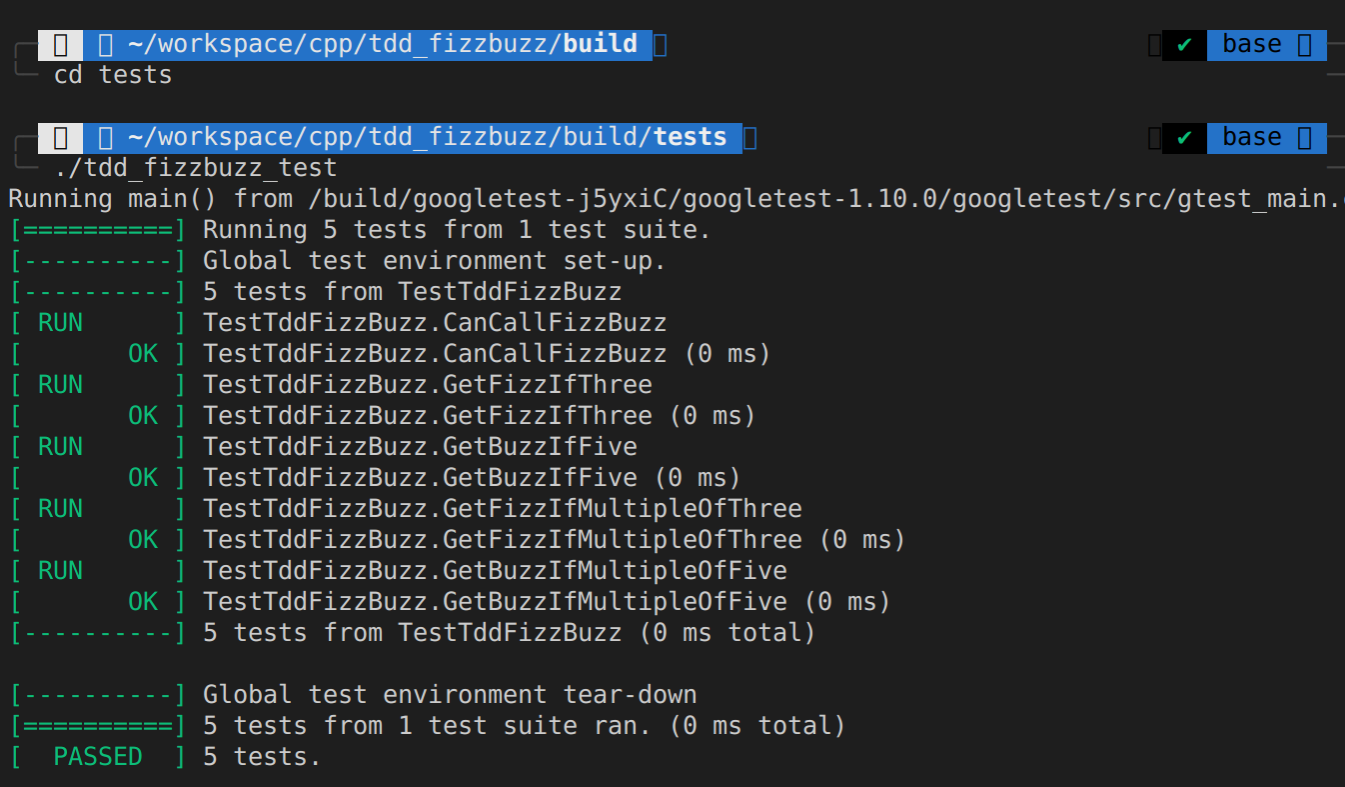
our all test cases pass
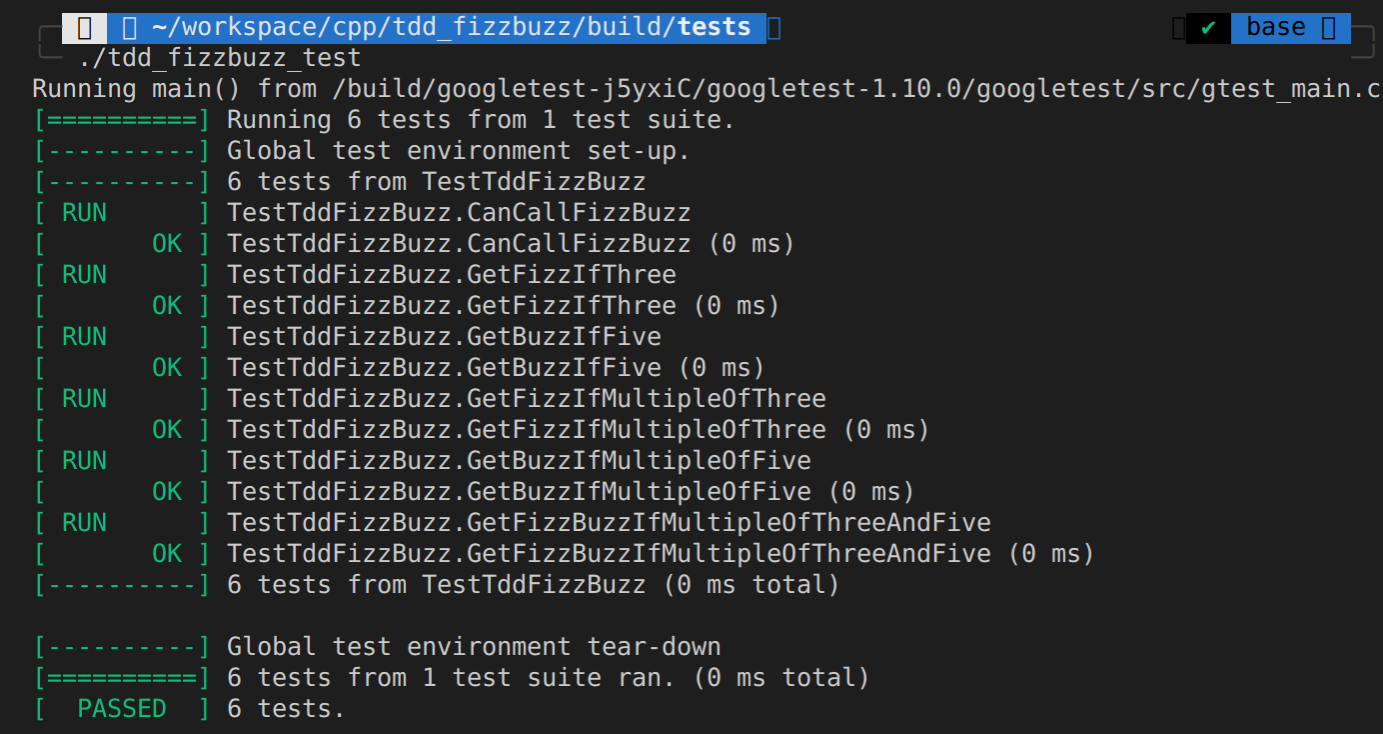
Hurray…! All test cases passed and our fizzBuzz function is now tested and completed. We can now use it in the main program to obtain the solution of problem statement.
To do this, I have
-
created main.cpp and put it in the src folder
-
modified the root CMakeLists.txt to create the binary for main.cpp
The main.cpp and modified root CMakeLists.txt files are as follows:
main.cpp
#include <iostream>
#include <string>
#include "fizzbuzz.h"

int main() {
  for (int i = 1; i <= 100; ++i) {
    std::cout<<fizzBuzz(i)<<std::endl;
  }
}
CMakeLists.txt (root)
```cmake
cmake_minimum_required(VERSION 3.15)
project(tdd_fizzbuzz)

# Generate the library libfizzbuzz

add_library(libfizzbuzz src/fizzbuzz.cpp)

include_directories(${CMAKE_CURRENT_SOURCE_DIR}/src/)
include_directories(${CMAKE_CURRENT_SOURCE_DIR}/include/)

# For Google Test
enable_testing()
add_subdirectory(tests)

add_executable(tdd_fizzbuzz_bin src/main.cpp)
target_link_libraries(tdd_fizzbuzz_bin libfizzbuzz)
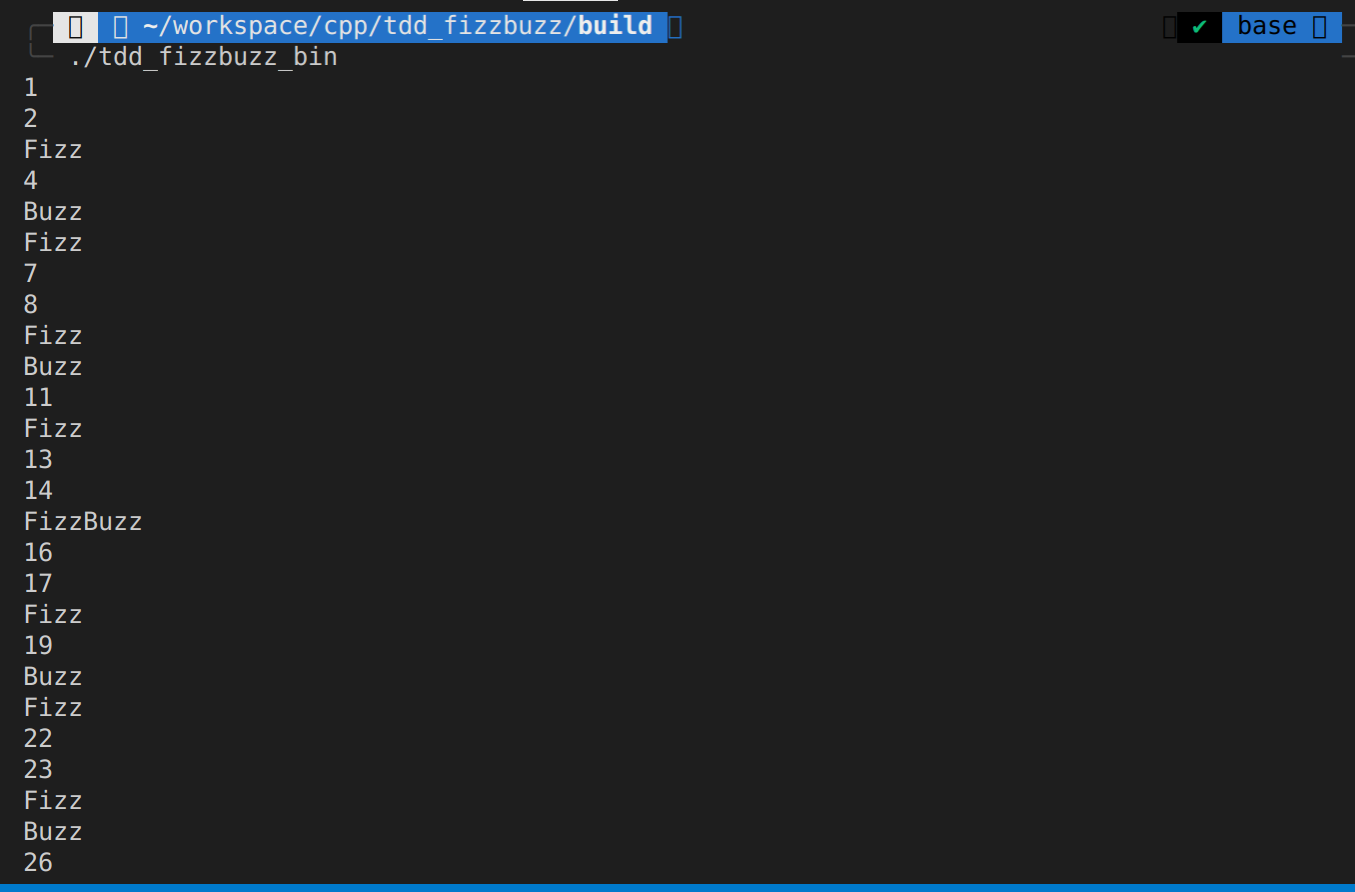
Following bash commands wil give us the final output.
# Assuming we are in the project root directory i.e., tdd_fizzbuzz

# To delete the current  build folder
rm -r build
# Create a new build folder, go to that folder and run root CMakeLists.txt
mkdir build && cd build && cmake ..
# execute the tdd_fizzbuzz_bin i.e., main executable
./tdd_fizzbuzz_bin
For more explanation, checkout this video from course [2].
References
[1] Modern C++ Programming with Test-Driven Development: Code Better, Sleep Better-The Pragmatic Programmers (2013) by Jeff Langr.
[2] Test-Driven Development in C++ by Richard Wells hosted on Lynda.com.