[Docker] Docker for AI developers: Basics (Part-III)
In the previous blog post, we studied about creating and running the detached containers, containers listening to incoming network connections and the concept of volumes. In this blog post we will see the basics to get started towards writing your own Docker images and the use of environment variables in Docker images.
Creating Your Own Docker Images
Until now we have used the already available images from the DockerHub to create and run the containers. In this section, we will understand how can we create our own Docker image for our application along with its dependencies.
A Docker image is created using the
docker buildcommand and aDockerfilefile.
“Dockerfile” is usually the name given to the file which describes how the image should be built and this name is convenient to refer also. If we name it with other name then we need to specify that name explicitly to the docker build command.
Creating our first Docker image to display the “Hello World”
A Dockerfile file always begins with a FROM instruction because every image is based on another base image. So here is our dockerfile for the same
Dockerfile
FROM debian:8
CMD ["echo", "Hello world"]
Here, our base image is debian linux image. The CMD instruction specifies which executable is run when a container is created using our image and provides optional arguments. [1]
To create the image from the above Dockerfile we type the following command in the terminal where this dockerfile is present as:
docker build -t hello .
In the above command, we are creating an image with name as hello from the Dockerfile present in the current directory i.e., . (last argument in the above docker build command) . One can see that desired image name is specified using the -t switch. If we do not provide the image name then some auto generated unique ID will be assigned by the Docker to refer that image. The build is run by the Docker daemon, not by the CLI. The output for above image is as follows:
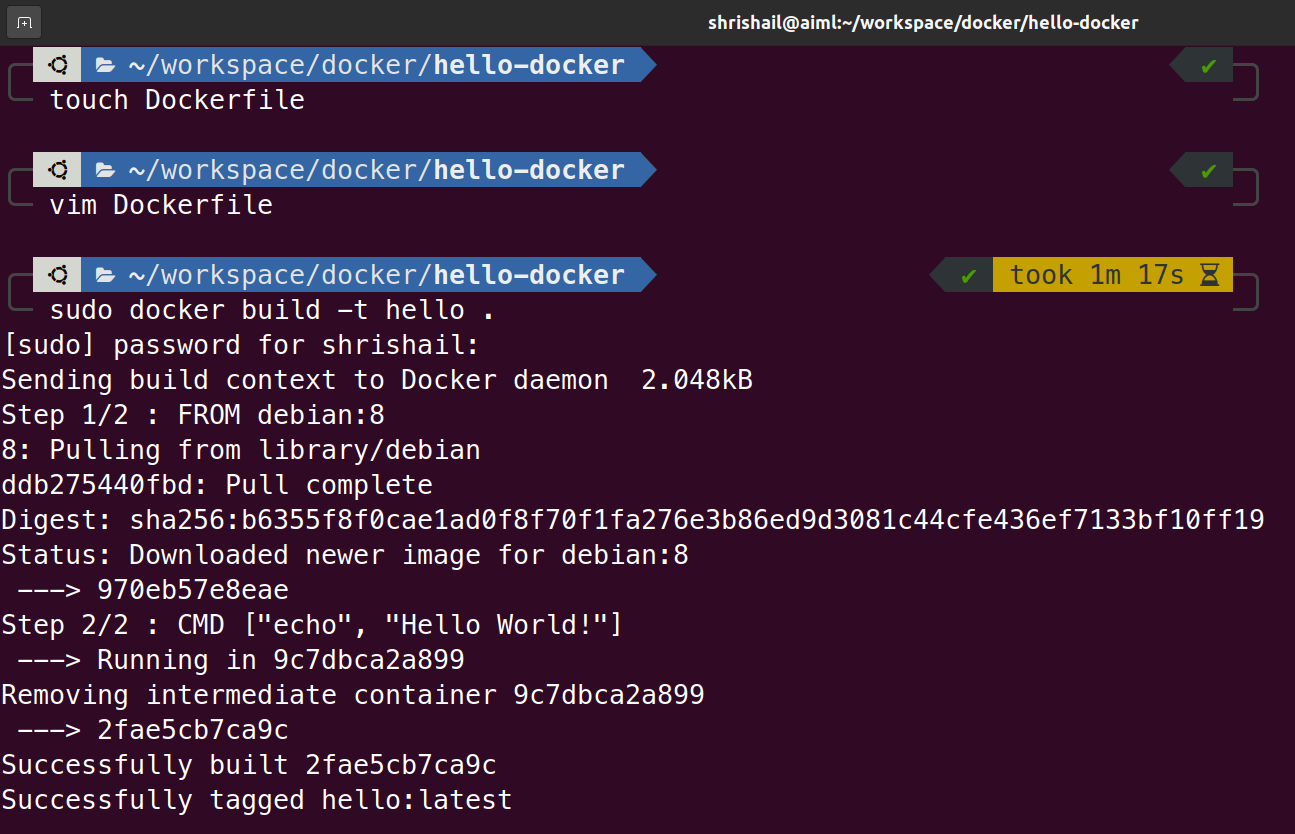
We can create and run the container using above image as we would do with any ready-made image from DockerHub. We can create, run and delete the container using
docker run hello
The output for above command is as follows:

Here is what we did in short
-
Opened the terminal in folder with name of our choice e.g.,
hello-docker -
Created a file with name
Dockerfilee.g.,touch Dockerfile -
Opened
Dockerfilein our favorite editor and specified how the image should be built and what it should do. -
Created the image using
docker build -t hello .wherehellois the name of our image and.specifies the directory whereDockerfileis present.
In case, your Dockerfile is present in some other directory, then one can use:
docker build -f /path/to/a/Dockerfile .
About tags of the images:
The hello image created above is actually referred by Docker as hello:latest image where latest is the tag of the image. If tag is not specified while creating the images then they will be by default tagged with latest tag. If you want to create an image with different tag then you may provide it while running the docker build command as follows:
docker build -t hello:1.0 .
It is recommended specifying the image tag for your own image and for the base image also if you want to make your image public so that others can use it without any breaking changes. If you want to keep up to date with new releases of the base image, update the tag manually and make sure you test your image before releasing it. [1]
Create an image Including Files
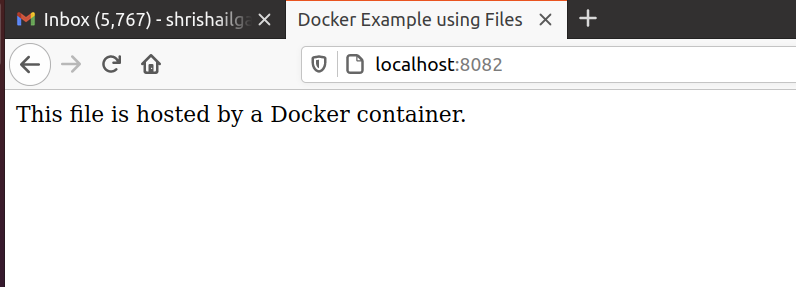
Suppose we have a HTML file named as index.html on our local computer and want that file to be served over HTTP to display the contents of it when we run the container from this image.
Here, index.html is as follows:
<html>
    <head>
        <title>Docker Example using Files</title>
    </head>
    <body>
        <p>This file is hosted by a Docker container.</p>
    </body>
</html>
For convenience, we can choose our base image to be NGINX. The Dockerfile is defined as follows:
Dockerfile
FROM nginx:1.15
COPY index.html /usr/share/nginx/html
One can see a COPY instruction used in the above file. Its first parameter is the file to be copied from the build context and its second parameter is the destination directory inside the image.
What is Build Context?
The build’s context is the set of files at a specified location PATH or URL. The PATH is a directory on your local filesystem. The URL is a Git repository location. [2]
Do not use your root directory,
/, as thePATHas it causes the build to transfer the entire contents of your hard drive to the Docker daemon.
Now to create an image called as webserver, we can use the following command
docker build -t webserver .
To create and run the container using our webserver image, we can use
docker run --rm -it -p 8082:80 webserver
Here, -rm and -it and -p switches will do the following:
-
The
-itswitch allows us to stop the container using Ctrl-C from the command-line -
The
-rmswitch ensures that the container is deleted once it has stopped -
The
-pswitch will map the port on our local machine (8082) to the port inside the container (80), thus HTTP request sent over 8082 port our local machine will be redirected to the port 80 inside the container.
The output of http://localhost:8082 on our local machine is as follows:
Having the images readily available locally makes it faster to run a container from them.[1]
Using Environment Variables
Whatever the technology you use inside your container, you can access environment variables. For example, if we set MyName environment variable, then we can access it in Linux shell as $MyName and in Python as os.environ.get(‘MyName’).
On a real machine, environment variables are set on your system. Inside a container, they can be set from several sources, which make them appropriate for parameterizing your containers [1].
In order to provide an environment variable’s value at runtime, you simply use the -e name=value parameter on the docker run command.
You may also want to define a default value for an environment variable. It can be declared inside your Dockerfile as
ENV MyName="Shrishail"
If we do not provide the value for the MyName variable in docker run command then default value of “Shrishail” would be used. It’s good practice to add an ENV instruction for every environment variable your image expects since it documents your image.[1]
Previously, we have seen that one can use the concept of volume in Docker for having a persistent file location while using the containers in which directory on the host machine is mapped to the directory inside the container using -v flag for the purpose of avoiding the data loss. We can document the volume while writing the Dockerfile as
VOLUME /path/to/directory
Creating a Docker image that runs a python file
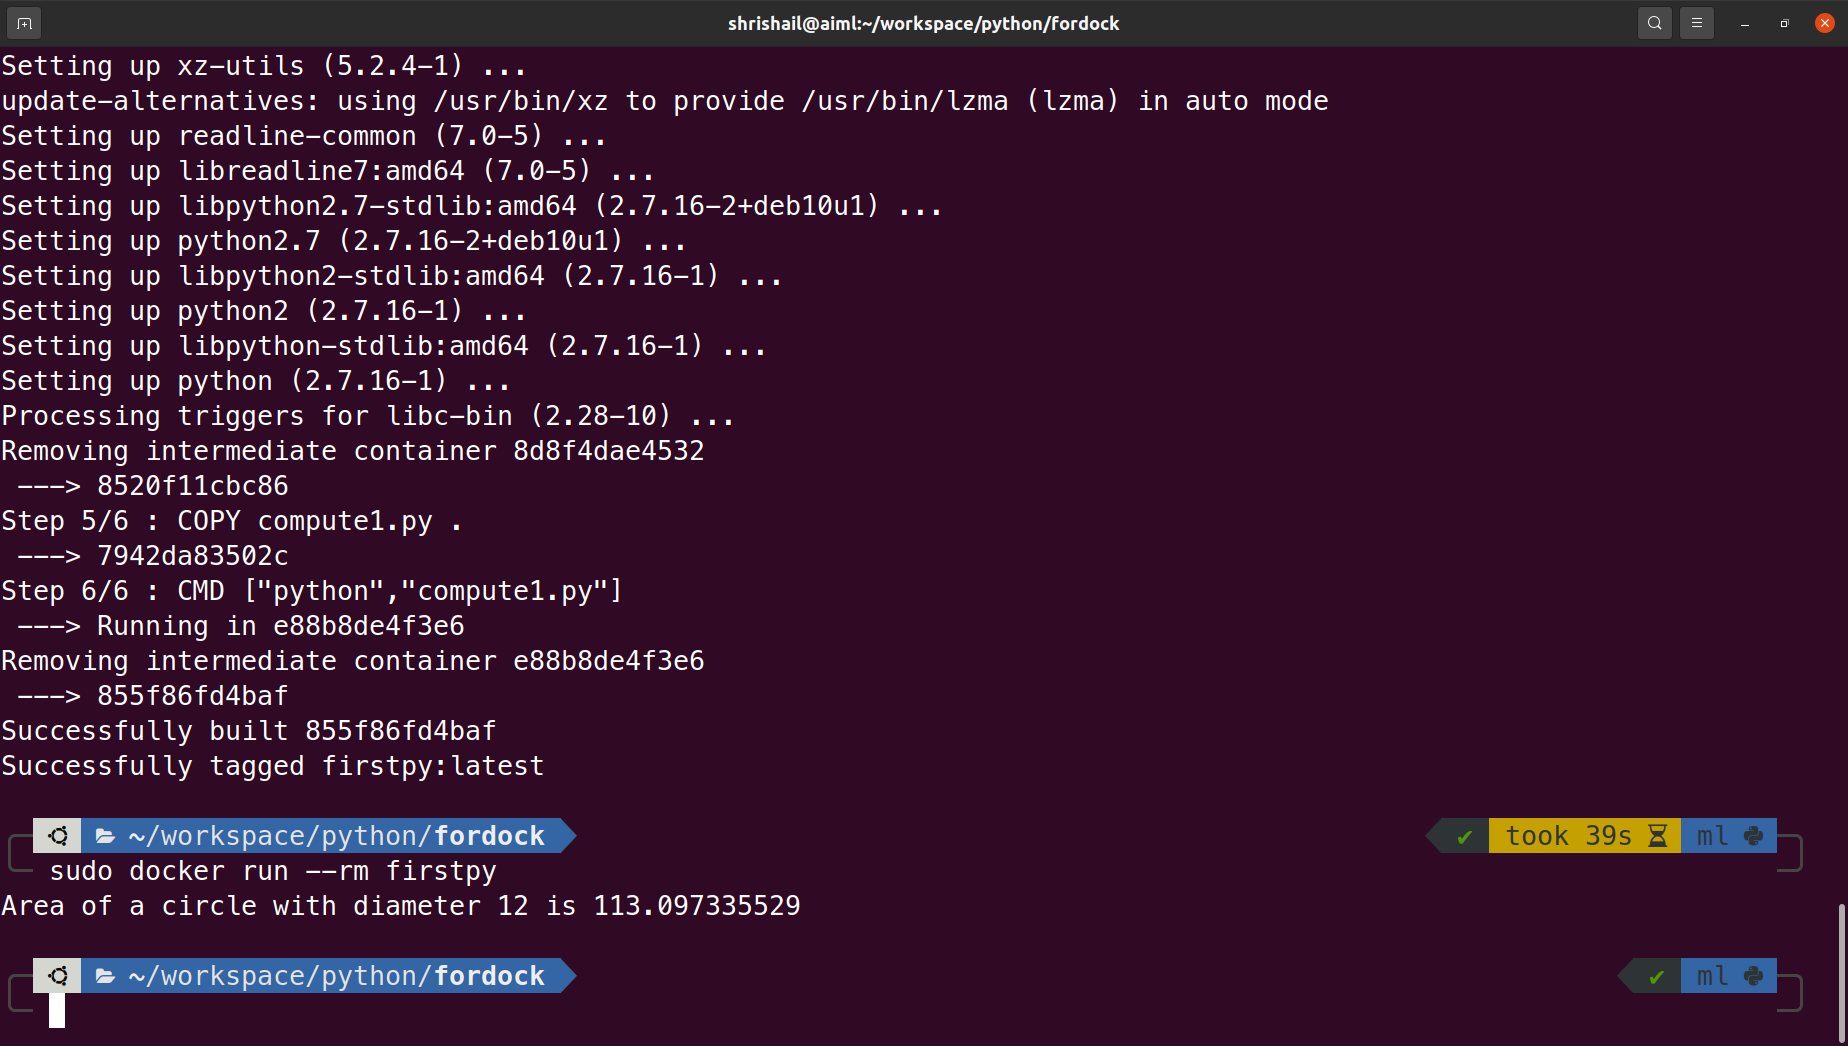
Now, as an exercise let us create an image such that when a container is run, it will calculate and print area of a circle using Python with diameter as an environment variable.
The program (compute1.py) to solve above exercise is as follows:
import os
import math

# get value of diameter as environment variable
diam = int(os.environ.get('diameter'))
area = math.pi*math.pow(diam/2,2)
print("Area of a circle with diameter {} is {} ".format(diam,area))
The Dockerfile is written as follows:
From debian:10
ENV diameter=12
RUN apt-get update -y
RUN apt-get install -y python
COPY compute1.py .
CMD ["python","compute1.py"]
Output for commands
sudo docker build -t firstpy .
sudo docker run firstpy
is as follows:
Please watch the hands on video below to understand, how to create your own Docker image.
Hosting your Docker image on the DockerHub
Please watch the hands on video below to understand, how to host your Docker image on the DockerHub.
References:
[1] Learn Docker - .NET Core, Java, Node.JS, PHP or Python by Arnaud Weil, 2018
[2] https://docs.docker.com/engine/reference/builder/